

Sydney homeowners usually don’t set out to buy “cheap waterproofing”. Most people are just trying to keep a renovation on budget, stick to a timeline, and get the bathroom back. The problem is that waterproofing isn’t like choosing a tapware finish or a mirror. When corners are cut, the failure often hides behind tiles for months, quietly swelling timber, rusting fixings, feeding mould, and spreading into adjacent rooms.
By the time the signs become obvious, the fix is rarely a simple patch.
This guide is designed to help you spot the red flags early, understand what often gets skipped before tiles go down, and make smarter decisions that reduce the risk of paying twice—especially in Sydney, where apartments, older housing stock, and humid coastal conditions can make moisture problems harder to ignore.
What “cheap waterproofing” usually means (without anyone saying it out loud)
“Cheap” rarely means one single thing. It’s typically a bundle of shortcuts that save time or materials on the day, but increase the chance of failure later. The most common patterns are:
- Rushed surface prep (dusty, damp, or uneven substrates)
- Skipped primers, bond breakers, or reinforcement detailing
- Not enough membrane thickness (too thin, patchy, missed coats)
- Poor treatment of corners, wall-to-floor junctions, and penetrations
- Weak connection to the waste/drainage point
- Tiles going on before curing times are properly met
- “Waterproofing” substituted with silicone, tile glue, or paint-on sealers that aren’t a compliant system
None of those shortcuts is glamorous. But they’re exactly where failures start.
Q: If tiles and grout are “waterproof”, why does the membrane matter?
Tiles and grout are part of the finish, not the waterproofing. Water will still get through grout lines, around fittings, and at junctions. The membrane is what’s meant to manage that moisture so it doesn’t enter the structure. When the membrane is thin, incomplete, or poorly detailed, the building elements behind the tiles become the sponge.
Early warning signs you might be paying twice
Bathroom waterproofing failures rarely begin with a dramatic flood. More often, it’s a slow leak that shows up as subtle changes you can easily dismiss as “settling” or “steam”.
1) That “always damp” smell that won’t leave
If you’re cleaning regularly but the bathroom still has a persistent musty odour, it can be a hint of trapped moisture behind wall linings or under the floor. Sydney’s humidity can make bathrooms feel clammy, but a smell that lingers even with ventilation is worth investigating.
2) Grout that keeps cracking in the same place
Hairline grout cracks can happen, especially with movement in older homes. The red flag is repeated cracking in the same line—often around the shower base, at wall-to-floor junctions, or near the screen. It can point to movement, poor substrate prep, or moisture affecting the bed.
3) Tiles that sound hollow, lift, or “drum”
A hollow sound underfoot or on the wall can mean poor adhesion, voids, or moisture affecting the bond. It doesn’t prove waterproofing failure on its own, but it’s a common companion problem when the system underneath wasn’t prepared correctly.
4) Swollen skirting boards or bubbling paint outside the bathroom
One of the most telling signs is damage outside the wet area—peeling paint on the hallway side of the bathroom wall, swollen door jambs, or stains in the adjacent room. That’s often the point where water has moved beyond the intended wet zone.
5) Silicone “fixes” that keep failing
If the bathroom requires frequent re-siliconing to “stop leaks”, it’s usually treating a symptom, not the cause. Silicone has a role (especially at certain junctions), but it can’t replace a functioning waterproofing system behind the tiles.
Q: What’s the single most common “I’m paying twice” sign?
Water damage showing up outside the shower area—staining, swollen trims, or mould on the other side of a wall. That often means the leak has been present long enough to travel.
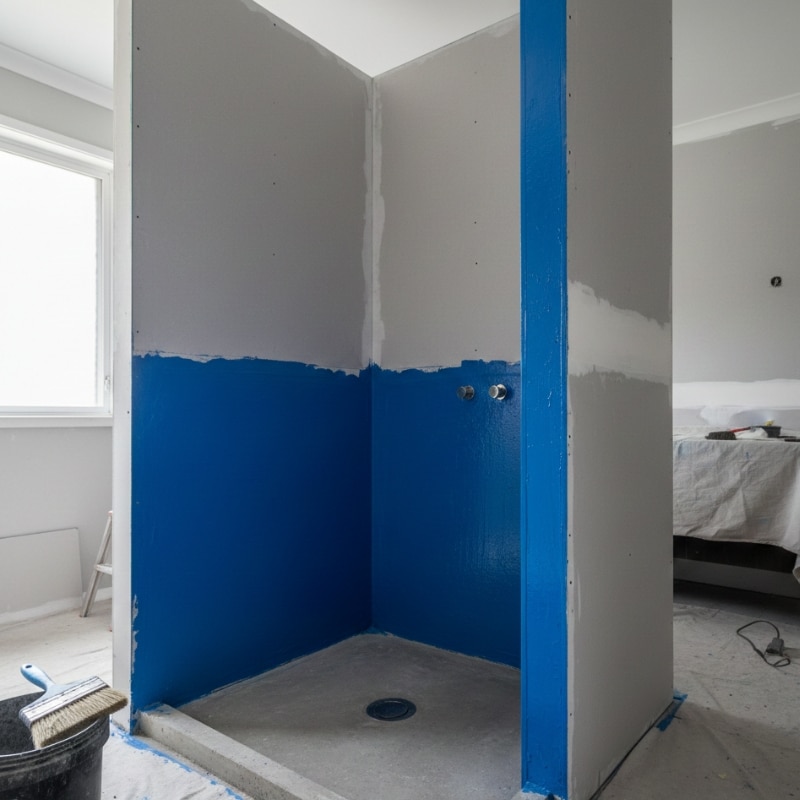
What often gets skipped before tiles go down (and why it matters)
A bathroom can look beautiful on completion day, even if the waterproofing underneath is risky. The shortcuts happen in layers—literally.
Surface preparation: the boring step that decides everything
Membranes need clean, stable, properly prepared substrates. Cheap jobs often rush this stage.
Watch-outs include:
• Dusty surfaces (membrane bonding to dust, not substrate)
• Damp substrates (trapping moisture under a coating)
• Unaddressed cracks or movement
• Uneven floors that fight the required falls to the waste
If the base isn’t right, every layer after it is compromised.
Primers and compatibility: not optional “extras”
Primers help membranes bond to cement sheets, screeds, and other substrates. Skipping primer can reduce adhesion and contribute to peeling or pinholing. Compatibility also matters—some adhesives and finishes don’t play nicely with certain membranes.
Corners, junctions, and penetrations: where most leaks begin
Corners and wall-to-floor junctions move. Pipes and mixers penetrate the waterproofing plane. Shower screens introduce fixings. Cheap waterproofing often fails at these change-of-direction points because they take time to detail properly.
Common “quiet” failures:
• Corners not reinforced or detailed correctly
• Wall-to-floor junction not treated to handle movement
• Pipe penetrations not sealed as part of the system (not just siliconed later)
• Door jambs and transitions missed or treated inconsistently
The waste connection: the most unforgiving detail in the room
In many shower failures, the weak spot isn’t the middle of the floor—it’s the connection where water is meant to leave the room. If the membrane isn’t properly integrated with the drainage point, water can track under the tile bed and spread.
Cure times and recoat windows: the “we’ll just push through” trap
Renovation schedules are tight. In Sydney apartments, you might also be working around strata noise windows, lift bookings, or access constraints. That’s where cure times get “compressed”.
Rushing curing can lead to:
• Soft membranes that tear or thin out
• Poor bonding between coats
• Tiles installed too early, trapping solvents or moisture
• Reduced long-term durability
If you want a simple way to sanity-check what you’re seeing on site (without turning it into a trade lesson), use a bathroom waterproofing inspection as your reference point for what should be in place before the first tile goes on.
Sydney-specific risk factors that make shortcuts show up faster
Bathrooms fail everywhere, but Sydney has a few common conditions that can accelerate problems or make rectification more painful.
Apartments and strata timing pressure
If you’re renovating in a unit, you’re often juggling:
• Limited work hours
• Noise restrictions
• Shared plumbing shut-offs
• Difficult access to materials and waste
• The need for documentation if water impacts another lot
That pressure can tempt trades to “just get it done” rather than let stages cure properly.
Older homes, timber movement, and uneven substrates
Sydney has plenty of older stock—Federation homes, post-war builds, and renovated terraces—where floors aren’t perfectly level and movement is part of the structure’s personality. Movement + rushed detailing is a recipe for cracks, gaps, and water pathways.
Coastal humidity and ventilation realities
Even a well-waterproofed bathroom needs good ventilation. But when waterproofing is already marginal, Sydney’s humidity can keep dampness lingering longer, making mould and odours appear sooner.
Q: Is “cheap waterproofing” more likely to fail in apartments?
It can be. Not because apartments are inherently worse, but because scheduling pressure, access constraints, and the cost of rectification (including potential impacts to neighbours) raise the stakes when shortcuts are taken.
A practical “before tiles” checklist for homeowners (no tools required)
You’re not expected to supervise trades like a certifier. But you can reduce risk by asking calm, specific questions and paying attention to visible cues.
Here’s what you can do without pulling anything apart:
- Ask what the waterproofing system is (not just “we’ll paint it on”)
- Ask what prep is being done to the substrate and why
- Look for consistent coverage (not patchy edges or missed corners)
- Ask how corners and penetrations are treated as part of the system
- Ask about the curing time before tiling starts
- Make sure the falls to the waste make sense before tiles lock it in
- Take date-stamped photos of stages (especially junctions and penetrations)
If you’re coordinating trades and trying to keep the timeline realistic, it helps to understand the usual sequencing and decision points in bathroom waterproofing for Sydney renovations—especially the stages that shouldn’t be rushed just to get to tiling day.
The “false economy” cost story: where paying twice really comes from
Even when people say, “I’ll just redo the silicone,” the real costs are usually elsewhere:
- Investigation (finding the true leak path)
- Tile removal and disposal
- Drying time (weeks, not days, in some cases)
- Replacing damaged sheeting, framing, or flooring
- Mould remediation where needed
- Re-waterproofing and re-tiling
- Potential impacts to adjacent rooms or neighbouring apartments
The most painful part is that a failed system often can’t be “patched” reliably. Waterproofing is layered and integrated—if the failure is at a junction, a penetration, or the waste connection, chasing it with surface fixes tends to delay the inevitable.
Q: Can you just waterproof over the top of existing tiles?
Sometimes people do “tile-over-tile” renovations for speed, but it doesn’t automatically solve underlying waterproofing issues. If moisture is already trapped, covering it can worsen odours, mould, or damage. Any approach needs to be assessed case-by-case.
When it’s no longer a DIY diagnosis moment
Some situations are your cue to stop experimenting and get proper advice:
- Water stains or swelling outside the bathroom
- Repeated grout cracking in wet zones
- A shower leak that worsens quickly with use
- Loose tiles combined with damp smells
- Mould is returning despite cleaning and ventilation improvements
- Any sign of water impacting a neighbour (apartments)
In NSW, waterproofing work is licensed trade work. If you want to confirm the licensing expectation in plain language, the NSW Government guidance is a solid reference: Waterproofing work (NSW Government).
When the signs point to moisture getting behind the finish, speaking with a licensed bathroom waterproofing team can help you work out whether you’re looking at a surface maintenance issue—or an underlying system problem that needs proper rectification.